
I Spent $200 to Transform My Garage Tool Wall! (Tool List Included)
It all started on a sunny Saturday morning when I tripped over my own toolbox—again. My garage tool wall was a jumbled mess of hammers, wrenches, and stray bits of hardware. I remember thinking, "There has got to be a better way!" That day, I made a decision that changed everything: I would invest $200 to transform my chaotic garage tool wall into a neat and inspiring workspace.
Discovering the Need for Change
I used to dread spending my weekends rummaging through piles of tools searching for the right one. Whether I was trying to fix a leaky faucet or build a new shelf, the clutter always slowed me down and added unnecessary stress. I knew if I could organize my tools, not only would it save time and frustration, but it could also make my garage a place I enjoyed spending time in.
After browsing a few home improvement forums and watching some YouTube tutorials, I realized that a DIY tool wall was exactly what I needed. The idea was simple: install a pegboard, add a few storage bins, magnetic strips, and custom shelving, and finally, put every tool in its place.
Planning the Transformation
Before I bought anything, I took a good look at my garage. I measured the wall space and made a list of all the tools I needed to store—everything from the common household hammer to less frequently used power tools. I then divided the wall into zones: one for hand tools, another for small parts, and one dedicated to power tools. I even planned a special spot for seasonal gear and safety equipment.
One of the best parts was sketching out a rough layout on paper. I envisioned not only a functional workspace but also a space that reflected my personality—clean lines, a touch of rustic charm, and lots of open space for my creative projects. The idea of turning chaos into order made me excited to get started!
The DIY Process
Step 1: Clearing the Clutter
I began by emptying the entire garage. Every tool, every box, and even those mysterious items I’d forgotten about were pulled out. I sorted through everything, discarding broken or unnecessary items and keeping only the essentials.
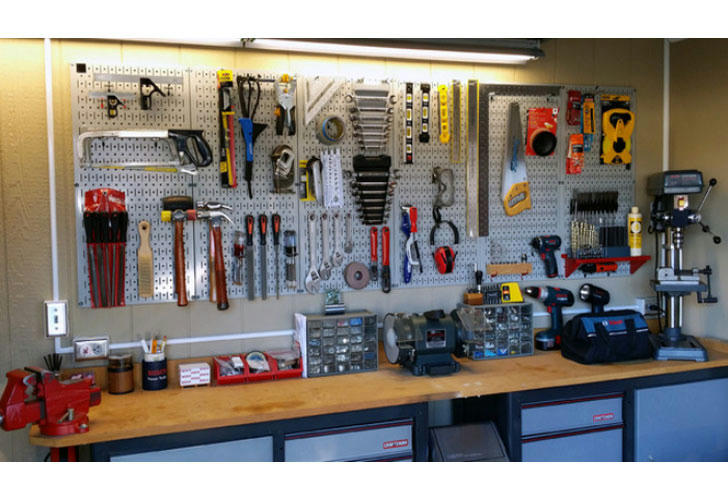
Step 2: Installing the Pegboard
Next, I anchored a large pegboard to the wall. This was the backbone of my tool wall. The pegboard, made of high-density fiberboard, offered a grid of holes that allowed complete customization. I spent a couple of hours drilling and securing it to ensure it was perfectly level.
Step 3: Organizing by Zones
With the pegboard in place, I assigned different sections for different tools:
Top Left: Hand tools like pliers, screwdrivers, and hammers.
Top Right: Power tools and their accessories.
Bottom: Small storage bins for nails, screws, and extra bits.
Center: A few magnetic strips for metal tools that I used daily.
Step 4: Adding Finishing Touches
To complete the look, I added a few decorative elements—a couple of framed inspirational quotes about DIY, a small clock, and even some string lights to give the workspace a cozy, inviting feel. Every item had its place, and suddenly, my once chaotic garage was transformed into an organized, efficient workshop.
The Results: A New Sense of Order
After the transformation, my weekends changed drastically. Instead of spending hours searching through clutter, I could now find exactly what I needed in minutes. The organized tool wall boosted my productivity, and I actually started enjoying the time I spent in the garage. When friends and neighbors visited, they were quick to compliment the sleek, professional look of my new workspace. It wasn’t just about storage—it was a complete lifestyle upgrade.
I even found that maintaining the organization was easier than ever. A quick weekly clean-up kept the pegboard neat, and the clear storage bins made it obvious when something was out of place. Plus, the project cost only $200, proving that even on a modest budget, you can create a functional and inspiring space.
Recommended Products for a Perfect Tool Wall
After my transformation, here are a few standout products that helped make it all possible:
1. Heavy-Duty Pegboard Kit
- Description: A robust, high-density pegboard with pre-drilled holes, perfect for customizing your tool storage.
2. Magnetic Tool Strip
- Description: A slim, adhesive magnetic strip to hang metal tools securely.
3. Adjustable Wall-Mounted Shelf
- Description: Versatile shelves for storing power tools and larger items, easily adjustable for different tool sizes.
4. Clear Stackable Storage Bins
- Description: Durable, transparent bins that let you easily see and organize small hardware.
5. Workbench with Integrated Storage (Optional Upgrade)
- Description: For those looking to enhance their workspace further, a compact workbench offers both a work surface and additional storage.
Final Thoughts
Transforming your garage tool wall can be a game-changer. Not only does it free up space and make your DIY projects more efficient, but it also turns a cluttered, stressful area into an organized, inspiring workspace. Imagine being able to spend your weekends actually enjoying your projects instead of wasting time looking for lost tools!
With just a $200 investment and a little planning, you can create a tool wall that fits your style, meets your practical needs, and boosts your productivity. So why wait? Embrace the DIY spirit, and let your garage become a space that reflects your creativity and passion for craftsmanship.
Ready to get started on your own transformation? Explore these recommended products, and let your garage become the envy of your neighborhood!