
How to Transform Your Garage Tool Wall
Are you tired of rummaging through piles of tools or watching your garage turn into a disaster zone every time you start a project? Transforming your garage tool wall can be a game‑changer—making your workspace efficient, organized, and downright inspiring. In this guide, we'll walk you through simple steps to clear the clutter, choose the right wall system, zone your tools, and add final touches that keep your projects running smoothly and your tools always within arm’s reach.
1. Plan Your Layout and Take Inventory
Before drilling a single hole, step back and survey what tools and supplies you really need. Ask yourself:
- Which tools do you grab most often?
- What categories make sense (hand tools, power tools, gardening gear)?
- Are there sentimental or decorative items you still want on display?
Sketch a quick layout on paper or a whiteboard. Divide your wall into zones—vertical columns or horizontal bands—so each group of tools has its own dedicated space. This roadmap saves time later and prevents random placement.
2. Clear, Clean, and Prep the Wall
- Empty everything: Remove all tools, shelves, hooks, and accessories.
- Deep clean: Wipe away dust, cobwebs, and grease. A pristine wall helps mounts stay secure.
- Inspect and repair: Patch holes, seal cracks, and mark stud locations for heavy‑duty fixtures.
Once your wall is spotless and structurally sound, you’re ready to install your new system.
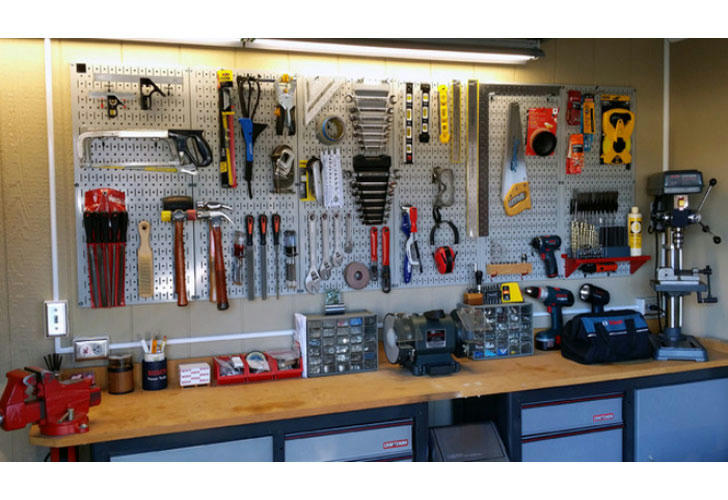
3. Select the Perfect Wall System
- Pegboard: Affordable and highly customizable. Grab a sturdy metal pegboard and mix in hooks, baskets, and shelf brackets.
- Slatwall panels: Strong and versatile—slide in specialty hooks, bins, and tool holders that can be reconfigured on the fly.
- Magnetic strips: Sleek and minimalist, ideal for metal tools like wrenches, hammers, and drill bits.
Feel free to combine systems: a central pegboard with slatwall “wings” and a magnetic strip above your workbench creates ultimate flexibility.
4. Zone It Out with Modular Storage
Divide and conquer by assigning each zone a purpose:
- Hand tools (left zone): Magnetic strips or peg hooks for pliers, screwdrivers, and wrenches.
- Power tools (center zone): Slatwall brackets or heavy‑duty hooks for drills, sanders, and saws.
- Garden gear (right zone): Wire baskets or weather‑resistant hooks for gloves, rakes, and hoses.
- Overhead bins: Lightweight totes for extension cords, safety goggles, and project leftovers.
- Rolling cart: Stow a narrow, multi‑drawer cart underneath for mobile storage.
Adjustable shelves, removable bins, and a rolling caddy ensure you can reconfigure your setup as needs change.
5. Light It Up and Label Everything
Good lighting is crucial. Add:
- Under‑shelf LED strips for bright, even illumination.
- Clip‑on work lights for targeted lighting on your bench.
Label every hook, bin, and shelf with a label maker or vinyl stickers. Clear labels mean no more guessing games—tools always go back where they belong.
6. Personal Touches and Functionality
Make your wall uniquely yours:
- Corkboard or dry‑erase board for notes and quick sketches.
- Themed hooks (wrench‑shaped, drill‑shaped) for gloves, aprons, or headphones.
- Chalkboard paint strip for jotting reminders or measurements on the fly.
These fun details keep the space inviting and encourage you to maintain order.
7. Recommended Products
To kick‑start your garage wall makeover, consider adding:
- Heavy‑duty metal pegboard with assorted hooks and baskets
- Slatwall panel kit for sliding tool holders and bin brackets
- Magnetic tool strip for easy access to hand tools
- Clear plastic storage bins in various sizes for screws and small parts
- Adjustable metal shelving units for overflow storage
- Fold‑down workbench with locking hinges for extra workspace
- Under‑shelf LED light strips for bright, focused illumination
- Label maker with vinyl tape for crisp, durable labels
- Rolling multi‑drawer tool cart for portable storage
- Chalkboard paint or peel‑and‑stick label strips for flexible labeling
Revamping your garage tool wall doesn’t have to be a weekend‑long chore. With a clear plan, the right wall system, smart zoning, and a few personal touches, you’ll have a workspace that’s organized, efficient, and uniquely yours. Now grab your drill, mount that first hook, and watch your garage transform from chaos to clarity!