
21 Days! We Really Hatched Chicks
It started as a simple idea: What if we tried hatching our own chicks? My husband and I, both retired and looking for new hobbies, decided to embark on this 21-day adventure. We had heard stories from our friends about the joy of watching life emerge from an egg, but we never imagined how much excitement, anticipation, and even nerves would come with it.
Why Hatch Chicks at Home?
For many older adults, retirement offers a chance to explore new hobbies and rediscover simple joys. Hatching chicks can be a fun, educational project that connects you with nature. Watching life emerge from an egg is a powerful reminder that it’s never too late to witness miracles and learn new things.
- Mental Stimulation: Keeping track of temperatures, humidity levels, and candling schedules engages the mind.
- Emotional Satisfaction: The anticipation of seeing tiny beaks peck through the shell is a source of daily excitement.
- Family Bonding: Grandchildren, friends, and neighbors often become curious, turning the hatching process into a community event.
Setting Up the Incubator
The first step was finding the right incubator. We researched online and ordered a fully automatic egg incubator from Amazon. The setup was easier than we thought. The instructions guided us through setting the right temperature (99.5°F) and humidity (around 50% for the first 18 days). The incubator even had an automatic egg-turning function, which was a relief since we didn't want to disturb the eggs too much.
Lesson 1: Proper temperature and humidity control are crucial for successful hatching. A digital hygrometer and thermometer helped us monitor everything accurately.
Once you’ve chosen an incubator, it’s time to set it up:
- Temperature: Aim for 99.5°F (37.5°C).
- Humidity: Keep it around 50–55% for the first 18 days.
- Egg Turning: If your incubator doesn’t have an automatic turner, remember to turn the eggs at least 3–5 times a day.
Why Turn Eggs?
Turning prevents the embryo from sticking to the shell membrane, ensuring proper development. Some modern incubators do this automatically, which is especially helpful if you have limited mobility or prefer a hands-off approach.
The Waiting Game
The next two weeks were mostly about patience. Every morning, we checked the incubator, ensuring the temperature remained stable. Around day 7, we performed our first candling session using a special flashlight to check for signs of life inside the eggs. To our amazement, we saw tiny veins forming!
Lesson 2: Candling is an exciting way to track chick development. We used an egg candler to identify viable eggs and remove the infertile ones to prevent contamination. By day 14, the embryos were visibly moving inside the shells. At this point, we increased the humidity slightly and stopped turning the eggs by day 18—this is called “lockdown,” the final stage before hatching.
Around Day 7, you can candle the eggs using a small flashlight or an egg candler. In a dark room, shine the light at the broad end of the egg to see the network of blood vessels. It’s truly a magical moment to witness that first sign of life.
Candling Tip: If you see clear, vein-like structures and a dark spot (the embryo), the egg is likely fertile. If the egg appears clear with no veins, it may be infertile or was never fertilized to begin with.
Candling again on Day 14 helps you track the chick’s growth. Remove any eggs that appear cloudy or show no signs of development to avoid contamination in the incubator.
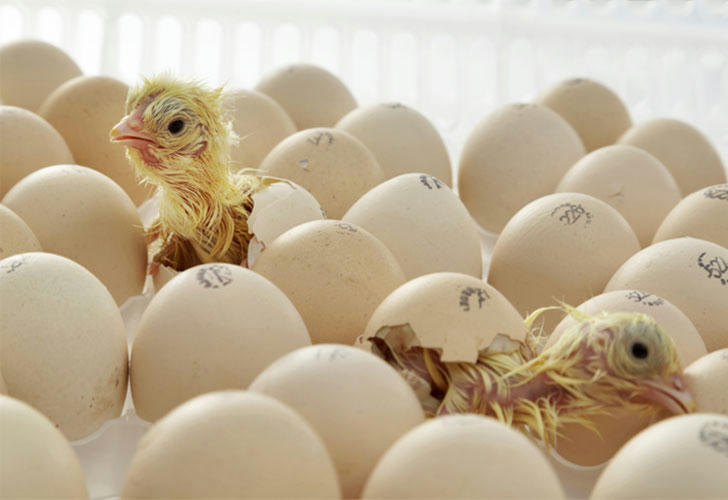
The Miracle of Hatching
On day 20, we started hearing faint chirping sounds from inside the eggs. It was incredible! The chicks were communicating even before they hatched. By midday, we noticed small cracks on a few eggs—this process is called pipping.
By the next morning, three chicks had broken through their shells. We watched in awe as they wriggled free, exhausted but determined. Over the next 24 hours, seven out of our ten eggs hatched successfully.
Lesson 3: Hatching is a slow process. It can take up to 24 hours from the first crack to the chick fully emerging. Patience is key! Raising the New Hatchlings
Step-by-Step Hatching
- Pipping: A small crack or hole appears.
- Zipping: The chick pecks around the shell’s circumference.
- Emergence: The chick pushes the shell apart and struggles out.
Stay Patient: It’s tempting to help a chick that seems to be struggling, but premature assistance can do more harm than good. They need time to absorb the remaining yolk and blood from the membranes.
Once hatched, the chicks needed a warm and safe place. We transferred them to a brooder box with a heat lamp, fresh bedding, and a small feeder and waterer. Their tiny peeps filled the room, and we felt an overwhelming sense of pride and responsibility.
After a few days, they started developing personalities. Some were adventurous, pecking curiously at everything, while others preferred to huddle together under the warmth of the lamp. Watching them grow was just as rewarding as the hatching process itself.
The 21-Day Timeline
Hatching chicks is a lesson in patience. Here’s a simplified timeline of what to expect:
| Day Range | What Happens |
|---|---|
| Day 1–7 | Embryo starts forming; veins become visible |
| Day 8–14 | Major organ development; chicks move within the egg |
| Day 15–18 | Rapid growth; prepare for lockdown |
| Day 19–21 | Chicks pip & hatch; final emergence |
Would We Do It Again?
Absolutely! The experience brought us closer together and gave us a newfound appreciation for the miracle of life. Plus, raising our own chicks meant we knew exactly how they were cared for from the start.
If you're considering hatching chicks, here are some essential items we highly recommend:
Recommended Products for Hatching Chicks
Fully Automatic Egg Incubator – Maintains the perfect temperature and humidity for hatching.
Egg Candler – Helps check the development of the embryos.
Digital Thermometer & Hygrometer – Ensures accurate incubation conditions.
Brooder Box Setup – Keeps your chicks warm and safe after hatching.
Chick Starter Feed – Provides the necessary nutrition for newly hatched chicks.
Hatching eggs is an experience that requires patience, care, and attention to detail—but the reward is beyond words. Whether you're a retiree looking for a fun project, a grandparent wanting to share an unforgettable experience with your grandkids, or someone who loves backyard farming, give it a try. You won’t regret it!
Have you ever hatched chicks before? Share your experiences and tips in the comments below!